Showing posts with label Desserts. Show all posts

Monday, October 3, 2016

Healthy Tropical Fruit Tart


Playing a little catch up today with some of my recent recipes! This fruit tart is one of my new favorites! A crisp macadamia and oat crust, filled with naturally sweetened coconut cream, and topped with fresh mango and sliced strawberries.


This recipe has all the sweet, tasty notes of a dessert but is full of all sorts of healthy ingredients! I shared it as part of my monthly contribution to SomewhatSimple.com so click here to check it out!

Tuesday, July 19, 2016

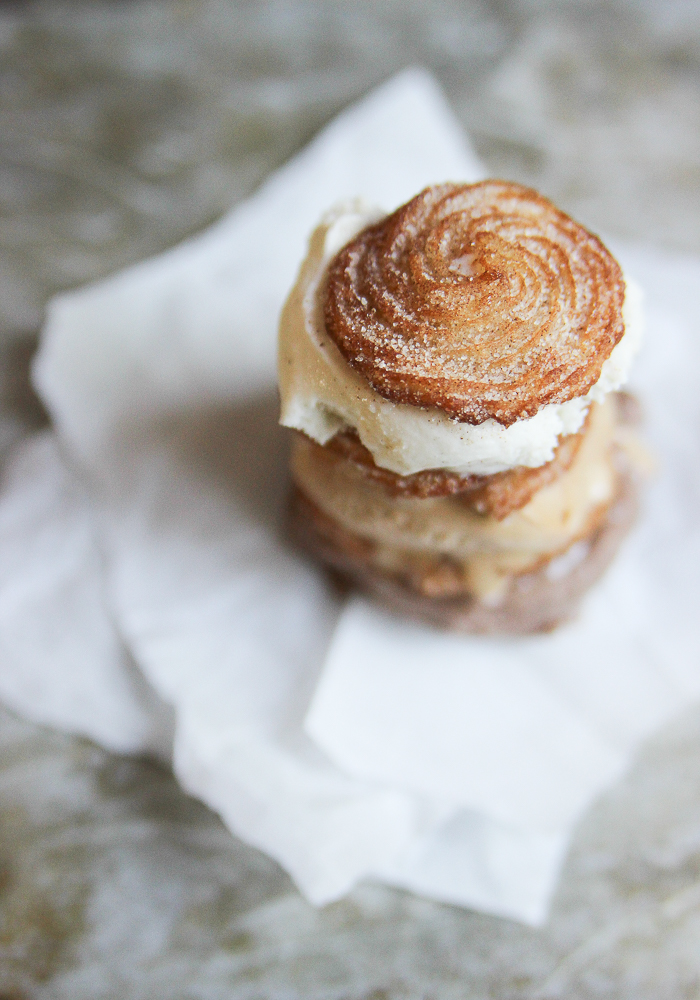
Churro Ice Cream Sandwiches

They say everyone has their vice, ours just happens to be ice cream.


Sandwich that ice cream between two warm homemade churros and you've got the perfect, melt-in-your-mouth, summer treat!

Today I'm sharing the recipe with Somewhat Simple. Find it HERE!

Tuesday, July 21, 2015

Banana Chocolate Chunk "Ice Cream"

I have to laugh that I'm posting this recipe....

Because awhile back I was talking with my sister-in-law when she told me about a recipe she had found for healthy banana ice cream and the utter disappointment when she discovered the one and only ingredient in this ice cream was simply, bananas. "That's not ice cream my friend... that a frozen banana disguised as ice cream!"

Well I'm here to tell you that this too is an ice cream created by an impostor... a banana. But here's the magical thing - you toss that frozen banana in a food processor and it suddenly becomes soft serve!


Add some peanut butter and chocolate chunks and you have a delicious creamy treat worthy of the hottest summer day! I'm sharing the recipe over on Somewhat Simple! Find it HERE.


Shared HERE.

Thursday, June 4, 2015

Mini S'mores Tortes

This week finally feels like Summer around here and I am drinking it in. Sunshine, swim lessons, and s'mores.


But not just any s'mores my friends. Over at our house we are devouring these mini s'mores tortes.

Crisp graham cracker and pecan crust, a cool, rich chocolate and coconut cream filling, topped off with a handful of warm, toasted mallows.


Perfect for Father's day, a warm summer evening with friends, or a midnight snack. :)


And today I'm sharing the recipe with Stephanie over on Somewhat Simple. Click HERE for the recipe!

Shared HERE.

Wednesday, April 22, 2015

Chocolate Black Bean Brownies

Things are about to get crazy up in here.

Trust me, I know how it sounds, but just take one bite and I promise you'd never guess these gooey chocolate treats are chocked full of black beans.


And also trust me when I say that you want to start by rinsing those puppies nice and clean. Extra-super-de-duper clean in fact.


In order to ensure that yummy brownie texture you'll want to track down a fine mesh strainer before you start.

Because these are going to be oh so much more delicious if you toss out those bean skins instead of baking them into your brownies.

Then all that's left is to add the rest of your ingredients to your food processor...


Fold in some mini chocolate chips...


Pour the batter into your pan...


And try not to eat the entire batch in one sitting.

But if you do... who cares right?! They're healthy... at least that's what I'm telling myself!

Chocolate Black Bean Brownies
Adapted slightly from: Chocolate Covered Katie
15 oz can black beans
1/2 c. pure maple syrup
1/2 c. quick oats
2 Tbsp cocoa powder
1/2 tsp baking powder
1 tsp vanilla extract
1/4 tsp sea salt
1/2 tsp cinnamon
heaping 1/2 c. mini chocolate chips

Directions: Preheat oven to 350 degrees F. Prepare an 8x8 baking pan with nonstick spray and set aside.

Begin by draining and thoroughly rising the beans. In a mini food processor, combine the rinsed beans and the pure maple syrup. Process until completely smooth. Place a fine mesh strainer over a large bowl. Add the bean mixture to the strainer. Using a rubber spatula work the beans through the strainer until all that is left is the bean skins, should be about 1/4 cup. Discard the bean skins.

Next add the bean mixture back into the food processor along with the remaining ingredients except the chocolate chips. Process until as smooth as possible. Fold the chocolate chips into the batter and then pour evenly into the prepared baking pan.

Bake for 17-18 minutes, they will look dry on the top. Cool for at least 10 minutes and then cut and serve.

...Or if you're feeling wild just grab a handful right out of the pan like this grabby-goose.


Shared HERE.

Monday, April 6, 2015

Wholesome Mini Yellow Cupcakes

Guys I seriously love me some mini cupcakes. And this particular version is full of all sorts of healthy wholesome ingredients.


After all the test cakes that went into this recipe, Tyson deserves a blue ribbon for his expert taste-testing abilities... but in the end I ended up making just a few changes from the chocolate version back here.

And heaven knows the girls were all about tiny cupcakes slathered in Nutella and dipped in rainbow sprinkles.

I'm oh so excited to be sharing this recipe with Rebecca over at Simple as That! You can find the full recipe here! Hope you love it as much as we do!

Wednesday, March 4, 2015

Healthy Berry Streusel Bars

Allow me to bring you into a little family inside joke... So my sister-in-law once told us she hates cooked fruit.

Kassi beware....cooked fruit ahead...the delicious kind coated in maple syrup...but if that's just not your thing, you should probably just stop reading now. :)


But as for me?? Bring it on!

 Cause really (Kassi) who says "No" to delicious warm berries melted together into a jam....


..and cooked between layers of hearty oats and almonds??


Not me! 'Cause I eat this stuff for breakfast, lunch, and dinner!


Love you Kass... even if you don't love cooked fruit.


Healthy Berry Streusel Bars
Recipe adapted from: Sally's Baking Addiction

2 Tbsp. corn starch
2 Tbsp. warm water
2 1/2 c. mixed frozen berries
2/3 c. pure maple syrup, divided
1 1/4 c. quick oats
1 c. rolled oats
1 tsp. cinnamon
1 c. natural almond butter
1/4 c. melted coconut oil
1 egg
1/4 c. slivered almonds

Directions: Preheat the oven to 325 F degrees. Line an 8x8 baking pan with foil allowing for some overhanging on each side for easy removal. Set aside.

In a small bowl mix together the corn starch and warm water until dissolved. In a pot over medium-high heat add berries and 1/3 cup of the syrup, stirring often. Once the mixture has come to a boil remove from heat and add the corn starch water and stir to combine. Set aside.

In a large bowl combine quick oats, rolled oats, cinnamon, almond butter, remaining 1/3 cup of syrup, coconut oil, and egg to make the crust. Mix with a rubber spatula until all ingredients are well incorporated. Reserve 1 cup of the mixture for the topping.

Add the remaining oat mixture to your prepared baking pan. Press batter into the pan with a rubber spatula until flat and even. Bake for 10 minutes. (The crust will still look wet when you take it out.)

While the crust is baking, in a small pan over medium heat add almonds and stir constantly until evenly toasted. Add the toasted almonds to reserved oat mixture.

Once the crust has baked for 10 minutes, remove it from the oven and carefully spread the berry filling over the top. Finally sprinkle the remaining oat/almond mixture on top. Bake for another 18-20 minutes.

Allow bars to cool. Using the foil remove from the pan, cut into squares, and serve.

Friday, February 20, 2015

Dark Chocolate Cranberry Oatmeal Cookies

This week I set out to make these with our little preschool group. They were all sorts of excited over the prospect of cookies for snack-time. But apparently making cookies with a table full of 3 and 4 year olds takes a little longer than anticipated.

So we had just enough time to toss one tray into oven so each child could gobble up one cookie before they headed home... leaving me with an entire bowl full of cookie dough.


Cookie Confession Time: I ate like... 100 (give or take a few.) Its easy to eat more than your fair share of these when they are fresh from the oven and easy to justify since they are full of whole grains and free of refined sugar. But still, 100 may have been a little much...


Dark Chocolate Cranberry Oatmeal Cookies
Recipe adapted from: Ultimate Oatmeal Cookies

1/4 c. butter, softened
1/4 c. raw honey
3/4 c. pure maple syrup
1 egg
1/3 c. natural peanut butter
1 tsp vanilla
1 1/2 c. rolled oats, divided
3/4 - 1 c. white whole wheat flour
1 tsp baking soda
1/2 tsp sea salt
3/4 c. dark chocolate chips
1/2 c. dried cranberries

Directions: Combine the butter and honey in a stand mixer or in a bowl with a hand mixer. Beat until light and fluffy. Add syrup, egg, peanut butter, and vanilla. Beat until well combined.

Add 1 cup of the rolled oats to a food processor or blender and process until finely ground like a flour. Add the ground oat flour to the batter along with the remained 1/2 cup of rolled oats, white whole wheat flour, sea salt, and baking soda. Once combined add the dark chocolate chips and dried cranberries.

Cover the bowl with plastic wrap, and chill in the fridge for at least 1 hour.

When ready, prepare a baking sheet with parchment paper and preheat the oven to 350 degrees F. Using a spoon or cookie scoop, place dough evenly spaced onto the prepared pan. Bake for 6-7 minutes. The cookies should look slightly underdone in the center and lightly golden brown just on the outsides. Serve warm or once full cooled, store in an airtight container.


Shared HERE.

Thursday, November 13, 2014

Peanut Sea Salt Chocolate [Truffles]

A few weeks ago we had a few friends over for a game night. It was one of those spontaneous last-minute invites so we were running around the house like crazy people trying to quickly pick up the inevitable trail of toys before anyone showed up. I wanted to make a treat for when company arrived but alas... we were on the tail end of our sugar-free adventure so my normal go-to recipes were no longer. After scouring our cupboards for a quick minute we decided on these little babies. Ground nuts, cocoa, dates and a little sea salt = "truffles."

But here's the thing... one of these couples had never been to our house before and for whatever reason, even as much as I love these little chocolate treats, I was a little self conscious about serving up a refined sugar free concoction... "Hi we are sort of weird and we don't eat sugar... welcome to our home." Awkward. That's pretty much how I saw it going down.

But to my surprise everyone embraced the weirdness and were on board for trying something new. By the end of the night we had polished off the last of the sea salt chocolate truffles and the rest is history.

I, self-admittedly, am a little addicted to these. This recipe saved me during our official sugar ban. (Thanks Lindsay!) But even still I find myself whipping up this recipe again and again.

Hope you love them as much as we do.


Peanut Sea Salt Chocolate [Truffles]
Adapted slightly from: Pinch of Yum

20 dates, pitted
1/2 c. peanuts
3/4 c. almond meal
1/4 c. cocoa powder
1 tsp vanilla
1/2 tsp sea salt
dark chocolate chips or melting chocolate

Directions: Begin by soaking the dates in hot water for a few minutes.

In a food processor combine peanuts, almond meal, and cocoa powder and pulse until mixture is ground. Remove the dates from the water and gently squeeze out any water. Add to the food processor along with the sea salt and vanilla. Pulse until a sticky thick "dough" has formed.

Roll into small balls to create truffles, about 1 to 2 tablespoons for each one. Place on wax paper or silicone mat.

Melt dark chocolate in a double boiler and drizzle over each truffle. Place in the refrigerator to harden and set. Keep in an air-tight container, and try not to eat them all in one day. :)


Shared HERE.

Monday, October 6, 2014

Three Favorite Pumpkin Recipes

This year I have been resisting Fall... and I feel a little guilty about it. Fall is my favorite. I love everything about the crisp Autumn air, changing leaves, and picturesque pumpkin patches. But this year I just feel the weight of the ever-approaching first snow... and I'm dreading it. Fall doesn't last long enough around here. The worst. So moral of the story is I guess I better capitalize on all the reasons to love the season while I still can. So this week we are gonna pack it in when the cousins come to visit!

To me nothing says Fall like coming home and baking up a yummy pumpkin treat after a long day spent outside enjoying the Autumn breeze. So here are my current three favorite pumpkin recipes.


Shared HERE.

Friday, October 3, 2014

Wholesome Chocolate Cake with Honey-Peanut Butter Drizzle

Alright... here's how you can "have your cake and eat it too." Chocolate Cake... that actually tastes like cake. AND....ready for it?? Its refined sugar free and has whole wheat. Take that health challenge!


This cake is subtly sweet with a mild chocolate flavor, so it paired perfectly with a little drizzle of honey sweetened peanut butter. And the best part? It left me actually feeling good.

I'll admit, this is no replacement for good old calorie-packed, sugar-loaded chocolate cake. But... if you're looking for a guilt-free wholesome alternative this is a great option.


Wholesome Chocolate Cake with Honey-Peanut Butter Drizzle
Adapted from: Baking a Moment

1/2 c. white whole wheat flour
1/2 c. unsweetened cocoa powder
1/4 c. all-purpose flour
3/4 tsp baking powder
1/2 tsp baking soda
1/4 tsp salt
1/4 tsp cinnamon
6 Tbsp coconut oil
2 eggs
1/2 c. honey
1/4 c. greek yogurt
1/4 c. unsweetened applesauce
1 tsp vanilla extract
1/4 c. pure maple syrup


4 Tbsp natural unsweetened peanut butter
2 Tbsp honey

Directions: Preheat oven to 325 degrees F. Grease an 8x8 baking pan and set aside.

Combine flours, cocoa, baking powder, baking soda, salt, and cinnamon in a large bowl. Add coconut oil and mix on low until oil has incorporated and mixture is dry and crumbly.

Next add eggs. Once the eggs are incorporated, add honey, greek yogurt, applesauce, and vanilla. Mix until just incorporated. Finally add maple syrup.

Pour the batter into the prepared pan and bake at 325 for about 30 minutes or until an inserted toothpick comes out clean.

Combine peanut butter and honey. Drizzle over the cake before serving.

Shared HERE.

Thursday, August 28, 2014

Goodbye Summer

This summer was year FOUR spent out East. But as much as we loved it, it always feels good to get home. Over the years I have come to appreciate the beauty and history of the east coast, but boy do I miss the dry Utah heat and the towering mountains surrounding me. I love this little town we call home.

This was the summer of princesses and was filled with cousins, boating, the farm, great friends and die-hard Sunday game nights.


These Mini Blueberry Galettes created by The Pioneer Woman were the star of new recipes discovered this summer. They are delicious. Like so delicious. We made them with homemade pie crust and I'm telling you... blueberry heaven. YUM!


And of course the annual Lake George camping trip to finish off the Summer; which, this year, will forever be fondly remembered as "The Debacle."


Goodbye Summer. Can't wait to see you next year!